Manage markup in Client
Markups can be added to the 3D Scene to highlight features or add work notes. Markup types include notes, arrows and polylines.
You can manage markup in Client on the Markups tab.
Tab Menu

| Icon | Description | |
|---|---|---|
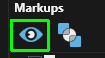
| 1 | Markup visibility | Toggle visibility of all markups. |
| 2 | Markup Display as Overlay | Toggle the draw order of all markups such that as overlays they are drawn last. Markups below the topographical surface will be visible when this setting is enabled. |
Managing markups
Markups are grouped in layers with multiple markups per layer and multiple layers possible. When markups are created they are organised in a tree view under a default Layer.
Right-click the Layer list item to open the context menu.
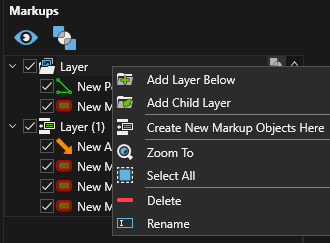
-
Add Layer Below - Add a new layer below the current layer.
-
Add Child Layer - Add a new layer as a child to the current layer.
-
Create New Markup Objects Here - Sets the selected layer as active so that new markups are created in the layer.
-
Zoom To - Zoom to the selected layer markups.
-
Select All - Select all markups in the layer.
-
Delete - Delete the layer (and its markups).
-
Rename - Rename the layer.
Markup items also have a context menu:
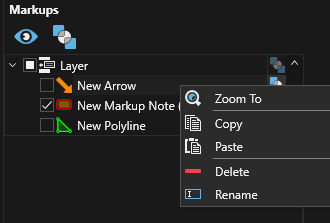
-
Zoom To - Zoom to selected.
-
Copy (Ctrl+C) - Copy the selected markup.
-
Paste (Ctrl+V) - Paste the copied markup, markup can be pasted into same layer (renamed as a copy) or into a new layer (same name).
-
Delete - Delete the selected markups.
-
Rename - Rename the selected markup.
To move a markup between layers by drag and drop an item between layers.
To select individual markup(s) use Ctrl+click.
To select multiple markups click at start of selection and shift+click to end selection.
Create a markup
-
In the 3DScene lower left click the Markup icon
 , when enabled the background changes to pale blue and markup icons are shown expanded.
-
Select the type of markup to create; Notes, Arrows or Polylines.
-
The markup will be added to the default 'Layer' or the layer that is set as active
 (Create New Markup Objects Here).
 -
Check that the Markup Visibility icon is enabled
 .
. -
Follow the steps below for the specific markup type.